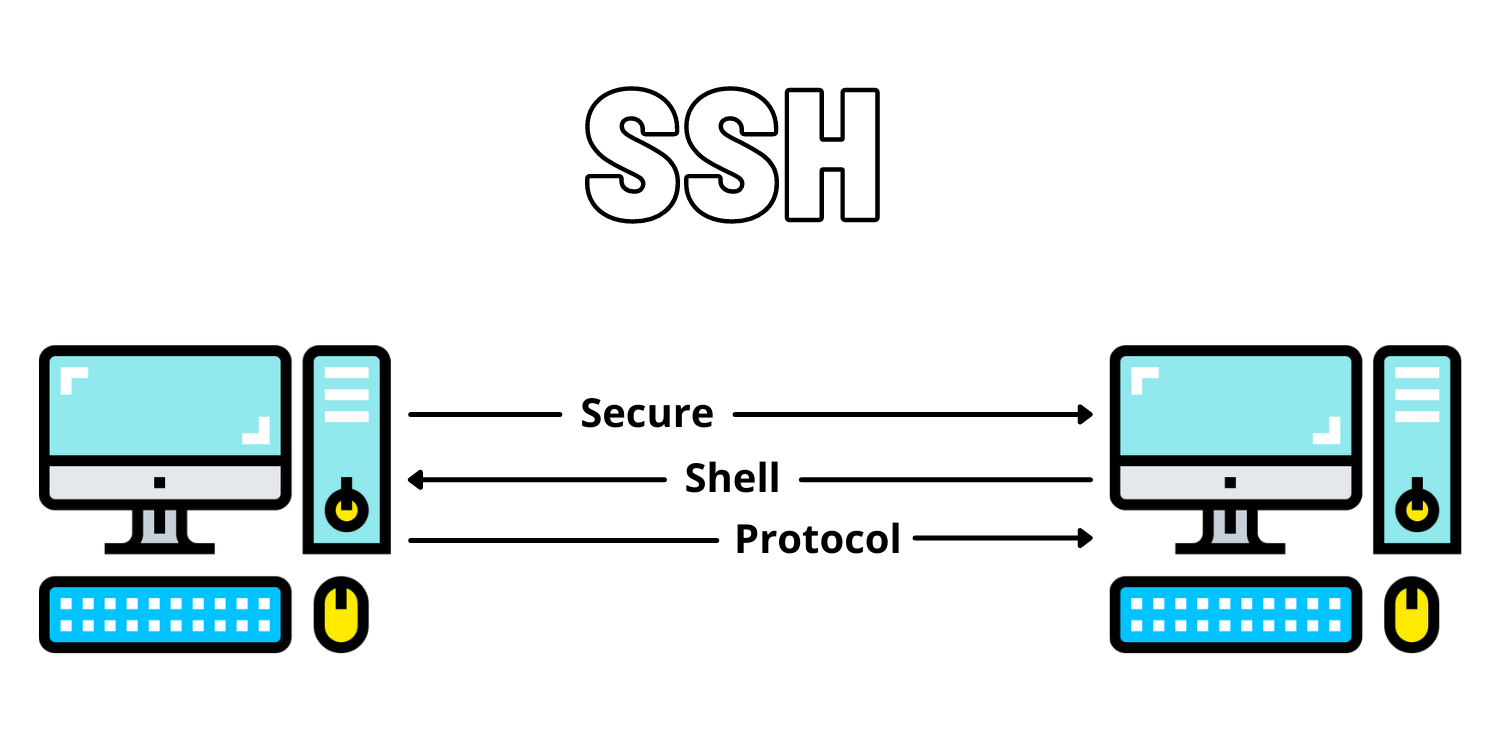
1.Dịch Vụ SSH - SSH và Mã Hóa: Quản Trị Hệ Thống Linux An Toàn
Chào các bạn! Hôm nay chúng ta bắt đầu một chương mới cực kỳ quan trọng: Quản Trị Hệ Thống Linux! 🐧 Và bài đầu tiên không thể nào khác được - đó chính là SSH (Secure Shell) - công cụ không thể thiếu của mọi System Administrator! 🔐
Bạn có bao giờ tự hỏi: Làm sao các kỹ sư DevOps có thể quản lý hàng trăm server từ xa một cách an toàn? Làm thế nào để đảm bảo dữ liệu truyền qua Internet không bị đánh cắp hay giả mạo? Câu trả lời nằm ở SSH và các thuật toán mã hóa bên trong nó!
Tại Sao Chúng Ta Cần SSH?
Vấn Đề Thực Tế
Hãy tưởng tượng bạn có một VPS hoặc server đặt ở data center xa hàng ngàn km. Làm sao để quản lý server từ xa hiệu quả và bảo mật?
🎯 Các Thách Thức:
- Remote Management: Server không ở gần, làm sao quản lý?
- Data Security: Đảm bảo dữ liệu truyền qua Internet an toàn?
- Identity Verification: Làm sao biết đang kết nối đúng server?
- Integrity: Dữ liệu có bị sửa đổi trên đường truyền không?
SSH - Giải Pháp Toàn Diện
SSH (Secure Shell) là giao thức mạng được mã hóa cho phép:
- ✅ Remote Login: Đăng nhập vào hệ thống từ xa an toàn
- ✅ Command Execution: Thực thi lệnh trên server
- ✅ File Transfer: Truyền file an toàn (SCP, SFTP)
- ✅ Port Forwarding: Tạo tunnel bảo mật
- ✅ Encrypted Communication: Mã hóa toàn bộ dữ liệu
I. Overview - Các Thuật Toán Mã Hóa
1. Symmetric Encryption (Mã Hóa Đối Xứng)
Symmetric Encryption sử dụng cùng một key để mã hóa và giải mã.
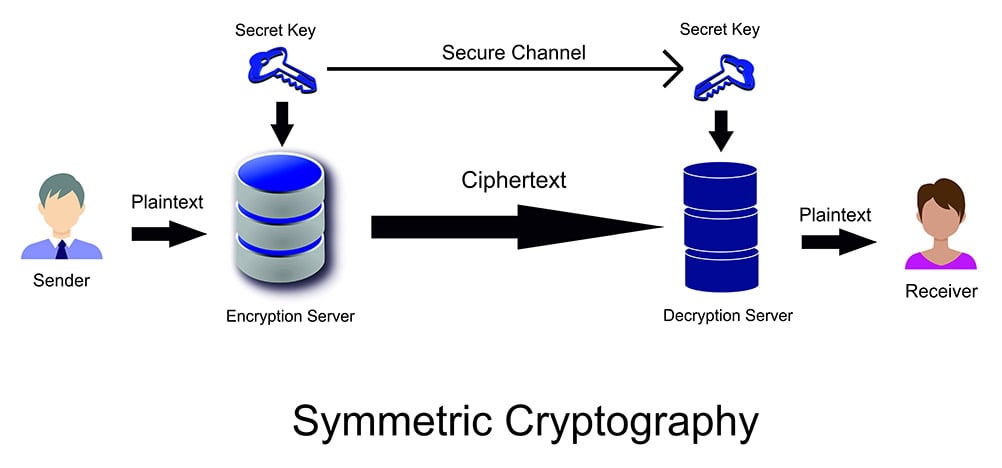
🔑 Cách Hoạt Động:
BOB và ALICE có chung một key
├── BOB mã hóa: "I love you" → "******" (dùng key)
├── Gửi qua Internet: "******"
└── ALICE giải mã: "******" → "I love you" (dùng cùng key)
✅ Ưu Điểm:
- Rất nhanh: Phù hợp mã hóa lượng lớn data
- Đơn giản: Algorithm đơn giản, efficient
- Low CPU: Ít tốn tài nguyên
❌ Nhược Điểm:
- Key Distribution Problem: Làm sao chia sẻ key an toàn?
- Ít bảo mật hơn: Key bị lộ = mất toàn bộ bảo mật
Thuật toán phổ biến: AES-128/256, ChaCha20
2. Asymmetric Encryption (Mã Hóa Bất Đối Xứng)
Asymmetric Encryption dùng một cặp key: Public Key (công khai) và Private Key (bí mật).
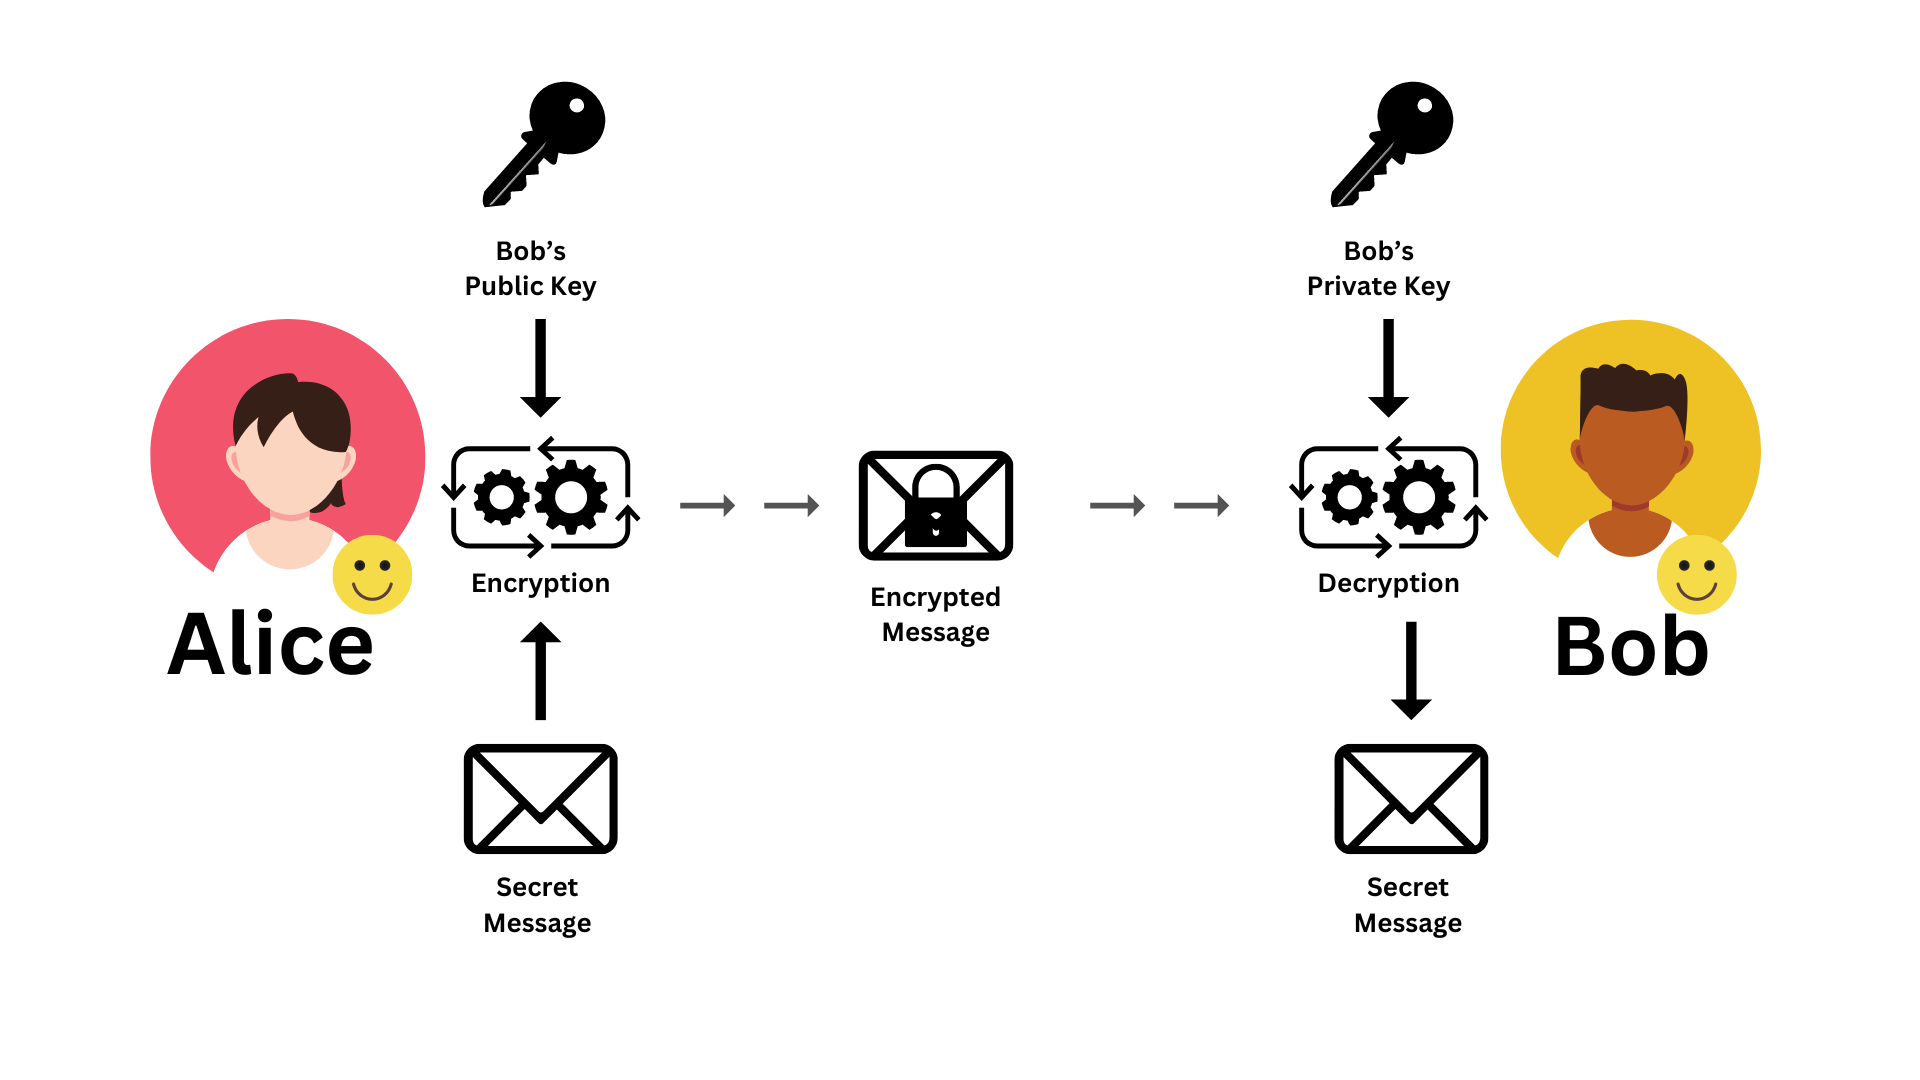
🔐 Cách Hoạt Động:
Mỗi người có 2 keys:
- Private Key: Giữ bí mật tuyệt đối
- Public Key: Công khai cho mọi người
📊 Quy Tắc:
- Encrypt với Public Key → Chỉ Private Key giải được
- Sign với Private Key → Public Key verify được
🎯 Ví Dụ: Bob Gửi Tin Cho Alice
Bước 1: Bob muốn gửi tin cho Alice
├── Lấy Public Key của Alice
├── Mã hóa: "I love you" → "******" (dùng Alice's Public)
├── Ký: Sign message bằng Bob's Private Key
└── Gửi: Encrypted message + Signature

Bước 2: Alice nhận tin nhắn
├── Verify: Dùng Bob's Public Key → Confirm Bob gửi ✅
├── Decrypt: Dùng Alice's Private Key → "I love you"
└── Đọc được tin nhắn an toàn!
✅ Ưu Điểm:
- Rất bảo mật: Private key không bao giờ chia sẻ
- No Key Distribution Problem: Chỉ share Public Key
- Non-repudiation: Không thể phủ nhận (đã sign)
❌ Nhược Điểm:
- Rất chậm: Chậm hơn symmetric 100-1000 lần
- High CPU: Tốn nhiều tài nguyên
Thuật toán phổ biến: RSA-2048/4096, Ed25519, ECDSA
So Sánh và SSH Sử Dụng Cả Hai
| Tiêu Chí | Symmetric | Asymmetric |
|---|---|---|
| Speed | ⚡ Rất nhanh | 🐌 Chậm |
| Security | ⚠️ Key phải chia sẻ | 🔒 Private key bí mật |
| Use Case | Bulk data | Authentication, key exchange |
SSH Hybrid Approach:
1. Dùng Asymmetric (RSA/Ed25519):
   └── Xác thực server/client
   └── Trao đổi Session Key

2. Dùng Symmetric (AES):
   └── Mã hóa toàn bộ session data (nhanh!)
II. How SSH Works - 7 Bước Hoạt Động chính
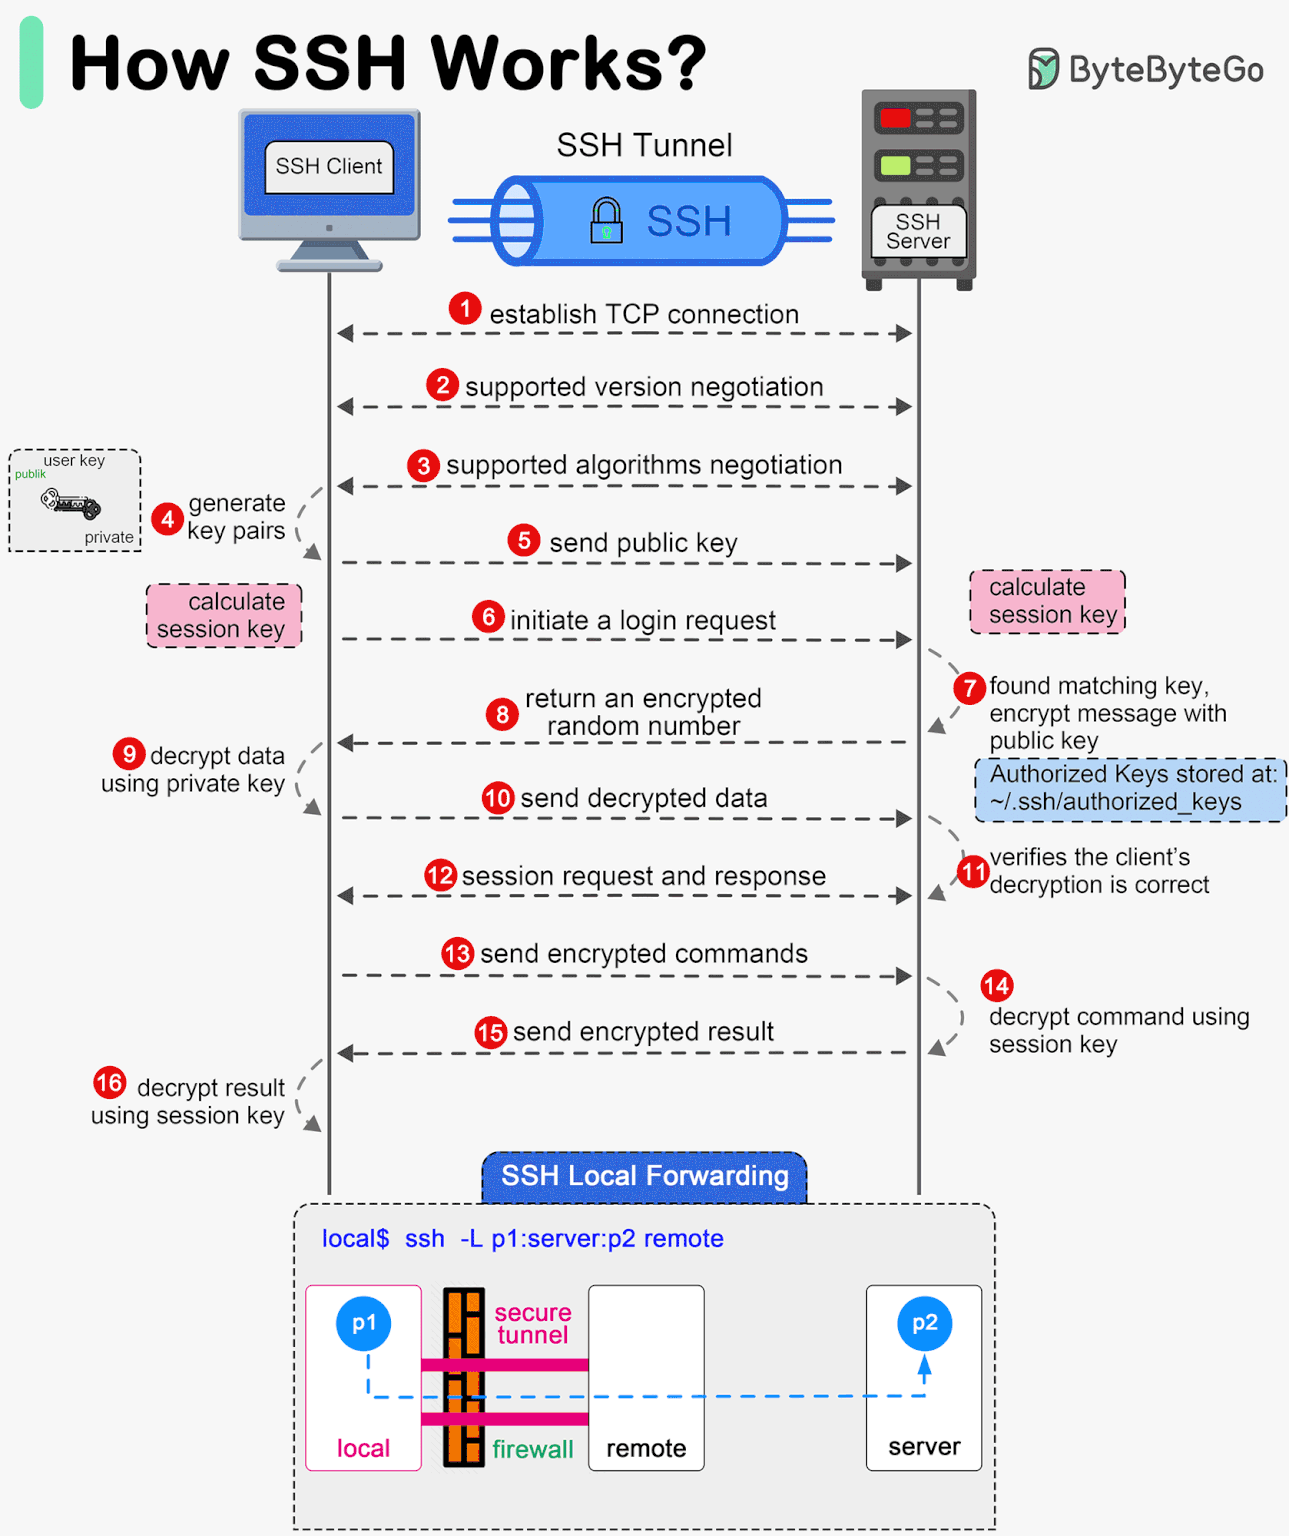
Tổng Quan
SSH Client                          SSH Server
(OpenSSH, PuTTY, Terminus)         (Port 22)
       │                                │
       └───────── SSH Protocol ─────────┘
7 Bước Thiết Lập SSH Connection
Step 1: Establishing Connection
Client khởi tạo TCP connection đến server port 22.
ssh username@server_ip
# TCP 3-way handshake
# ✅ Connection established
Step 2: Server Identity Verification
Server gửi Public Key để client verify.
The authenticity of host '192.168.1.100' can't be established.
ED25519 key fingerprint is SHA256:xxxxx.
Are you sure you want to continue connecting (yes/no)?
Mục đích: Đảm bảo kết nối đúng server, không bị MITM attack.
Step 3: Negotiating Encryption Parameters
Client và Server thỏa thuận thuật toán mã hóa.
// Chọn algorithms:
Selected:
  ├── Key Exchange: ecdh-sha2-nistp256
  ├── Encryption: chacha20-poly1305
  ├── MAC: hmac-sha2-256
  └── Compression: none

// Tạo Session Key (Symmetric)
// ✅ Session Key cho bước tiếp theo
Step 4: Authentication
Client chứng minh identity.
A. Password-Based:
ssh username@server
# Nhập password
# ❌ Có thể bị brute force
B. Key-Based (Recommended):
# Client có Private Key
# Server có Public Key
# Server gửi challenge
# Client sign bằng Private Key
# Server verify → ✅ Login!
Step 5: Establishing Secure Channel
Encrypted channel được thiết lập.
┌─────────────────────────────────┐
│   Encrypted SSH Channel         │
│   (Mã hóa bằng Session Key)     │
│   ├── Commands                  │
│   ├── Output                    │
│   └── File transfers            │
└─────────────────────────────────┘
Step 6: Session Handling
User thao tác trên server.
$ ls -la
$ vim file.txt
$ scp file.txt user@server:/path/
Step 7: Termination
Đóng connection.
$ exit
# Session Key destroyed
# ✅ Connection closed
III. Best Practices và Security
🔒 Security Recommendations
1. Disable Root Login 2. Use Key-Based Authentication 3. Change Default Port 4. Use Strong Keys (Ed25519) 5. Enable Firewall 6. Use Fail2Ban
IV. Thực Hành Trên Ubuntu
A. Setup SSH Server
Bước 1: Install
sudo apt update
sudo apt install openssh-server -y
Bước 2: Start & Enable
sudo systemctl start ssh
sudo systemctl enable ssh
sudo systemctl status ssh
Bước 3: Configure
sudo vim /etc/ssh/sshd_config
# Important settings:
Port 2222                    # Change port
PermitRootLogin no           # Disable root
PasswordAuthentication no    # Use keys only
Bước 4: Restart SSH
sudo systemctl restart ssh
B. Setup SSH Client
Linux/Mac:
ssh username@server_ip
Windows:
- OpenSSH (built-in Windows 10+)
- PuTTY: https://www.putty.org/
C. Generate SSH Keys
Step 1: Generate Key Pair
# Ed25519 (recommended)
ssh-keygen -t ed25519 -b 4096 -C "[email protected]"

# RSA
ssh-keygen -t rsa -b 4096 -C "[email protected]"
Files created:
~/.ssh/
├── id_ed25519      ← Private Key (KEEP SECRET!)
└── id_ed25519.pub  ← Public Key
Step 2: Copy Public Key to Server
# Method 1: ssh-copy-id
ssh-copy-id -i ~/.ssh/id_ed25519.pub username@server_ip

# Method 2: Manual
cat ~/.ssh/id_ed25519.pub
# Copy and paste to server's ~/.ssh/authorized_keys
Step 3: Connect
ssh -i ~/.ssh/id_ed25519 username@server_ip
# ✅ Login without password!
Tổng Kết
Chúng ta đã tìm hiểu về SSH - công cụ không thể thiếu cho System Administrator:
🔐 Remember:
- Luôn dùng key-based authentication
- Disable root login và password auth
- Change default port
- Keep system updated
- Use strong keys (Ed25519/RSA-4096)
📚 Bài Tiếp Theo:
Trong các bài sau, chúng ta sẽ đi sâu hơn về:
- SSH Tunneling chi tiết: Local, Remote, Dynamic Forwarding
Hẹn gặp lại các bạn trong bài viết tiếp theo! 🚀
Tags: #Linux #SSH #Security #SystemAdministration #DevOps #Encryption #PKI